Smartwaiver Integration
Last updated: September 4, 2024

FareHarbor integrates with Smartwaiver, a popular digital waiver solution. Your customers can fill out a waiver or release form online and it will automatically be added to their booking. Smartwaiver offers waivers in several languages including English, French, Spanish and Dutch.
To make use of this integration, you’ll need a Smartwaiver account with your waiver created. Feel free to contact FareHarbor Support if you’d like help getting started.
How it works
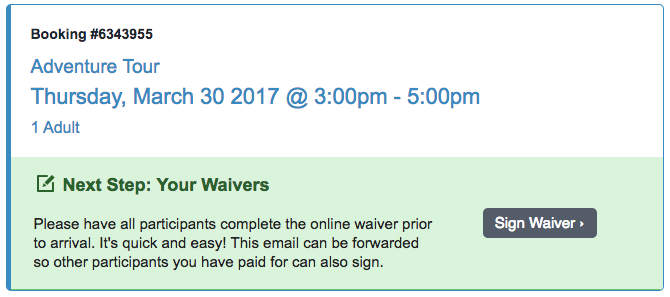
Once Smartwaiver is integrated with your FareHarbor Dashboard, your customers will have a new section in their confirmation email and receipt page asking them to sign your waiver(s):

The confirmation email with the Sign Waiver link can be forwarded to each individual on the booking, allowing all waivers to be automatically collected in FareHarbor.
Note: When multiple individuals need to sign a waiver, be sure they access the Sign Waiver link from the booking confirmation email. Otherwise, signed waivers will not be correctly associated with the customer’s booking in FareHarbor.
Signed waivers will be added to the booking, below the customer information. From the Waiver Options menu, you have the option to view a PDF of the waiver, or remove it from FareHarbor.

You can also see the number of people who have signed waivers for each booking from your manifest. Make sure you’ve added the Waivers column in your manifest to see this information. Learn more about manifest settings.
Setting up the Smartwaiver integration
Our team is happy to complete all of these steps for you! Get in touch with us and let us know you’d like us to set up waivers in your Dashboard. Otherwise, follow the instructions below to set up waivers in FareHarbor.
- Email FareHarbor Support with your Smartwaiver username and password and we’ll link your FareHarbor account to your Smartwaiver account.
- Add your waivers to FareHarbor in Settings > Waivers.
- Create a new Waiver custom field in Settings > Custom Fields. The Title and Description you enter for this field will be shown in the customer’s confirmation. After the field is created, click “Edit field” and add the waivers that you want your customers to sign.
- Add the Waiver field to any items that require a waiver. The field should be added under whole-booking fields rather than individual customer types.
- Recommended: Add waiver columns to your manifest to see how many waivers have been completed, along with participants’ name, age, and email.

Accessing a customer’s waiver link
Once the integration is completed, customers will be able to sign waivers directly from their booking confirmation email. However, if you want to access or send a direct link to a customer’s waiver:
- Open the customer’s booking in FareHarbor.
- Click the Send email or text button.
- Click Preview email to preview the confirmation email.
- Right click and copy the Sign Waiver link address.
Paste this link in your browser’s address bar or send it in an email to the customer, if needed. When the waiver is signed using this link, it will be added to the customer’s booking in FareHarbor.
Important notes
Pre-existing waivers
If you were already using Smartwaiver before integrating with FareHarbor, make note of the following:
- Waivers that were signed before the integration will not automatically be attached to bookings in FareHarbor.
- If you were linking to your waiver on your website or in email before the integration, you should direct customers to use the “Sign Waiver” button in their confirmation email instead. This ensures their waivers are attached to their booking in FareHarbor.
Making changes to bookings with waivers
- When you rebook, any signed waivers are moved to the most recent booking, as long as the new item or availability requires the same waivers.
If needed, you can remove a waiver from a booking in FareHarbor by opening the menu next to the participant name and selecting Remove waiver.

Why don’t I see a customer’s signed waiver?
If a customer claims they signed their waiver but it’s not showing on their booking in FareHarbor, this is usually because the waiver was signed using a different link than the one in their confirmation email. The link that customers use to access their waiver should look something like this (note the fh_id tag at the end):
https://www.smartwaiver.com/auto/?auto_waiverid=56032718e60c3&auto_tag=fh_id_10862111
To confirm that a waiver was signed, you can log into the your Smartwaiver account and double-check the View Signed Waivers section.
API bookings and waivers
If you have an API connection with one or more online travel agencies like Expedia or Viator, it’s important to note that confirmation emails for bookings made through these channels will not include waiver information. This means that customers booking through online travel agencies will not automatically receive their waivers.
To ensure that these customers receive their waiver information, you can send an updated confirmation email through FareHarbor. To do this:
- Verify that the customer’s email address is included on the booking.
- Click Send email or text (located under Booking actions).
- Click Preview email.
- Verify that the email includes the Next Step: Sign Your Waiver link.
- Send the email.