Affiliate Dashboard tools
Last updated: October 9, 2025
This help page is intended for affiliates working with, or interested in working with, FareHarbor.
The affiliate Dashboard includes a variety of tools to help manage your team, customize your communication, and streamline booking operations. Whether you are setting up user access, sending messages to customers, or managing your payment methods, this guide provides step-by-step instructions for the most common actions. Use the sections below to learn how to configure your Dashboard and make the most of its features.
Managing users
A user is anyone who is able to log in to your FareHarbor affiliate Dashboard (for example, your company manager, staff, reservationists, etc). Users are managed from the Settings > Users & Permissions page of your Dashboard. You can give your users specific permissions when accessing your affiliate Dashboard. For example, a Director user can generate reports and view all bookings and booking amounts, whereas a Guide user cannot.
Creating a user
To create a user:
- Navigate to Settings > Users & Permissions on your Dashboard.
- Click + New user.
Note: If you do not see the + New user button, it’s likely that you do not have the permission to add new users. - Enter a name, username, and email. Click Next to continue.
- Select Send user info email under Password Setup.
- Select a permission group under Permissions. If the user should be able to make bookings, select a Partner group. Otherwise, leave this field blank.
Note: If you have selected an incorrect permission or partner group, you can reset the field by clicking on the red X. - Check the box next to User agrees to the FareHarbor terms of service.
- Click Create user.
Resetting a user’s password for them
Only users with permission to create and edit other users (Director users) can manage passwords.
There may be some situations where you would like to prompt a user to reset their password or set a temporary password. This can be useful if you are onboarding a new crew member or need a user’s password to be changed immediately due to security reasons.
Note: Remember, you can also require a user to reset their own password the next time they login if there is no urgent need to reset the password immediately.
To reset a password on behalf of another user:
- Go to the Settings > Users & Permissions.
- Find the user account that requires the password reset and click on Edit.
- Go to the Account tab and select the Password tab.
- Check the box next to Reset password to see the reset password options.
Select a method to reset the user’s password (Important note: both options, when selected, immediately invalidate the existing password of the user.):
Send user info email (recommended): This sends an email to the user with their information, including their username and a link to reset their own password.
Note: If a user has not set an email on their account, you are not able to select this option.
- Set temporary password: This option allows you to manually set the user’s password or generate a random password for them. You then have to communicate the new password to your user outside of FareHarbor.
- Select Save changes to finalize.
You can see the password status of a user in the Password tab of their Account page. You can see whether the user has an existing password, a temporary password, an expired password, or requires password reset.

Deleting, deactivating, and reactivating a user
To delete a user:
- Go to Settings > Users & Permissions.
- Click Edit next to the user you want to delete.
- Click the Account tab, then go to Permissions.
- Click the Delete this user entirely link under the User status section, then click the red Delete user button.
- A popup appears asking you to confirm, click OK to finalize.
To deactivate a user:
- Go to Settings > Users & Permissions.
- Click Edit next to the user you want to deactivate.
- Click the Account tab, then go to Permissions.
- Select Deactivated from the User status dropdown and click Save changes.
To reactivate a user:
- Go to Settings > Users & Permissions.
On the Users page, click the Display options (gear icon) and select Show deactivated users.

Click Edit next to the user you want to reactivate.
- Click the Account tab, then go to Permissions.
- Select Active from the User status dropdown, and click Save changes.
Canned messages
Canned messages allow you to save and reuse commonly-used messages when communicating with customers. They are created and managed in your Dashboard settings, and once created you can edit them at any time.
A few examples of how canned messages can be used:
- Provide the customer with your contact information.
- Include information about a specific tour in confirmation emails.
- Send a weather update to your customers the day before a tour.
- Include directions and parking information in an automated reminder.
- Send a text message with a last-minute change of location or emergency information.
Creating canned messages
To create a new canned message:
- Go to Settings > Canned Messages (under Communication).
- Click the + New canned message button.
- Select a Type for your message. For example, if you are creating a canned message related to cancelled bookings, choose the Cancellation type. If your message does not fall under a specific category, just choose Message.
- Enter a Name for your message. This helps you identify it when choosing from your list of messages. The message name is not visible to the message recipient (the customer).
- Type your message in either the Email message or Text message content box. Note that your Text message content is limited to a maximum of 130 characters.
- Click Create canned message.
Adding canned messages to emails and texts
You can add a canned message to any text or email message directly from a booking.
To add a canned message to a text or email from a booking:
- Open the booking from which you want to send the message.
- Click Send email or text.
- Select Send email or text on the right-hand side.
Click the icon below the Message box to select from your list of canned messages. Messages are organized by type (Cancellation, Confirmation, Follow-up, etc.).

Select the message you want to send.
Note: You can edit the canned message prior to sending without affecting the saved canned message.- For emails, click the X on an email address to remove the customer from the email, or if sending a text, deselect the checkbox next to their name. See Texting customers for more information on sending text messages.
- To see what an email looks like before sending it, click the Preview email button located below the Message box.
- Click either Send text or Send email.
Sending stand-alone canned messages
Stand-alone canned messages are useful when you do not need to send detailed booking information to the customer.
To send a canned message on its own, make sure that the overall email type is set to Message, then select your canned message using the icon. This sends an email containing only the contents of the canned message.
Editing canned messages
- Navigate to Settings > Canned messages.
- Locate the canned message you want to update, then click the Edit button.
- Edit your canned message as desired.
- Click Save.
To delete a canned message:
- Navigate to Settings > Canned messages.
- Locate the canned message you want to update, then click the Edit button.
- Click the Delete button.
Agents & desks
Agents
Agents are the members of your team that make bookings on the affiliate Dashboard. For example, individual reservationists or concierges. You can run reports on agents to monitor created bookings during a specific time period. This is especially useful for concierge desks, where each team member receives commission based on the bookings they created.
Setup
Agents can be preloaded on an affiliate Dashboard under Settings > Agents or you can add an agent at the time of booking on the book form, after which the agent automatically appears in the dropdown for future bookings.

When making a booking on behalf of an agent, you can tag the agent on the booking:
- Select an availability on the calendar to create a booking.
- Select the Agent dropdown menu and select the agent making the booking.

To delete an agent:
- Navigate to Settings > Agents (under Network).
- Select Edit next to the agent you would like to delete.
- Select the gray Edit button on the new page.
- Choose Delete and confirm your selection.
Desks
Desks are the locations under your company name and it is useful if you need to keep track of bookings made from each location. For example, Poolside Concierge or Front Desk.
To create or manage your Desks, go to Settings > Desks (under Network).
After a desk is added in this section you can select it when a booking is being created via the corresponding dropdown menu.

After the booking has been completed, the agent’s name and desk will be displayed in the booking notes:

To delete a Desk:
- Navigate to Settings > Desks.
- Select Edit next to the desk you would like to delete.
- Select the gray Edit button on the new page.
- Choose Delete and confirm your selection.
Saving company cards
Adding your company card
By adding company cards to your Dashboard, you can use the Net Rates payment relationship type to pay the tour operator more quickly, without having to enter your company credit card details each time you place a booking.
To add a company card:
- Go to Settings > Bank & Payments and select the Cards tab.
- Click New card.
- Enter a name for your card (for example, Island Tours Company Card).
- Enter the card information.
- Click Create card.

To edit the card’s access settings (who can see and use it):
- Go to Settings > Bank & Payments and select the Cards tab.
- Open the card you would like to configure.
- Select the boxes corresponding to the visibility permissions you would like to set up for the tour operator (under the Access tab). For each partner, you have the following options:
- Allow use when booking for: Allow the card to be pre-saved and used by you or your staff when you are making bookings in your Dashboard for that specific partner.
- Allow use by partner: Allow the card to be used by the tour operator when they are making bookings assigned to you.
- Click Save to finalize.

Using your company cards
Your company cards can be charged when making a booking for partners for whom you have pre-saved the card. Logged-in users see all cards they have access to when completing the payment section of the book form:

Once a company card is charged, the transaction is logged on the booking overview (in the payments summary and the activity log). Company card payments are not shown on the customer’s confirmation email, but are displayed on receipts, in a generalized format:

Updating cards
There are multiple options to update your added company cards:
- Reordering cards: You can add multiple cards and reorder them using the icon next to the card name. The order of your cards is reflected in the Payment Method section of the book form.
- Updating cards: To update or delete a card, click Edit next to the card name, then go to the Settings tab.
- Deactivating a card: When a card is deactivated, it is no longer visible as a payment method when creating bookings. This applies to both your own dashboard and any partners you’ve shared the card with. This is useful if you need to temporarily prevent a card from being used without deleting it entirely.
- Updating card information: If needed, you can enter new card information while keeping the same access settings. For example, if your company card expires and you receive a new card, you can update the information on file without having to set up a new card from scratch.
- Deleting a card: Deleted cards can no longer be used by you or any affiliates or partners you’ve shared them with. You will still be able to see payments that were previously made with the card on bookings or in reports.
How do I know my card information is secure?
All cardholder data is securely stored with our payment processor Stripe, a PCI Level 1-certified provider.
Creating custom calendars
A custom calendar is a saved collection of settings for the Bookings section of your Dashboard. It’s a useful way to personalize your Dashboard and set up views for different activities or users. For example, you can filter the visibility to show only the products you’ve agreed to resell.
To create and save a custom calendar, use the menus on the Bookings toolbar:
- Set your preferred configuration using the Filter and Display options (gear icon) menus.
- Open the Custom calendars menu.
- Click New custom calendar.
- Enter a name for your calendar.
- Click the Create button. Your custom calendar is automatically added to the list.

To access a saved custom calendar:
- Go to the Bookings section of your Dashboard.
- Open the Custom calendars dropdown menu from the toolbar.
- Choose your custom calendar.
Once selected, the custom calendar is applied to your Bookings section. It will also be highlighted in the custom calendars list.
Important note: If you make any changes to your custom calendar, remember to save it again to retain the changes.
Updating the calendar view
If you need to make changes to a saved custom calendar, you can do so by selecting the desired calendar, editing your configuration, then saving it again with the same name. To do this:
- Select the calendar you wish to edit using the Custom calendars menu.
- Adjust your preferences using the Filter and Display options (gear icon) menus.
- Click Custom calendars again and click the edit icon (the pencil) next to your calendar’s name.
- Select the box next to Update to current settings on save.
- Click Save to finalize.

Creating and managing payment types
Creating a payment type
In case you need to keep track of the method that was used when you or your staff made the booking, FareHarbor allows you to create payment methods and report on them.
To create a payment type:
- Go to Settings > Bank & Payments > Payment Types
- Click the + New payment type button.
- Enter a name for the payment type (mandatory) and a SKU (optional).
- Click Create to finalize.
Creating a booking with a new payment type
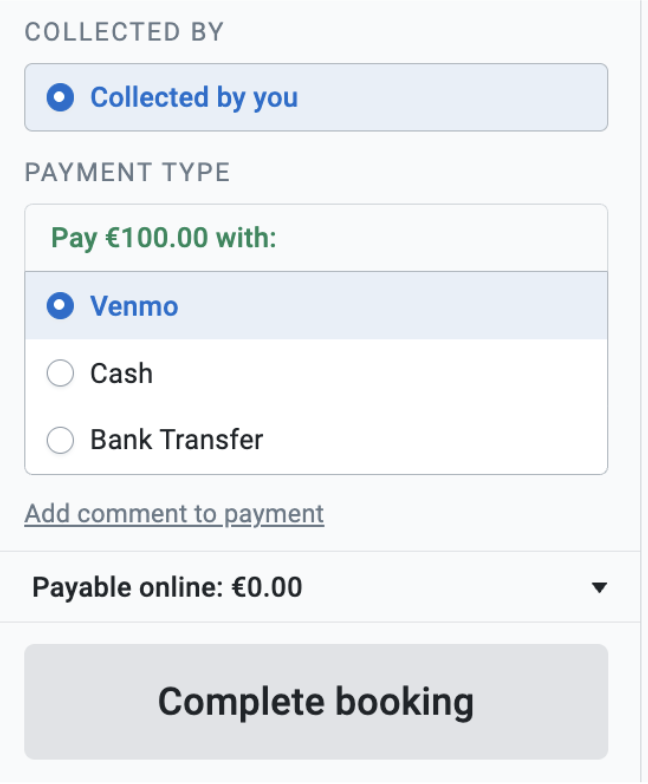
The option to select a payment type when creating a booking is only available if you have agreed to a Billing payment relationship type with the tour operator. This way you collect payment in your own system, but can use the payment type in FareHarbor for reference.
When adding the payment to the booking, you have the option to select the payment type that was used:
You can also generate a report based on a payment method.